MCP Evaluation Quickstart
Learn to evaluate model-context-protocol (MCP) based applications using deepeval, for both single-turn and multi-turn use cases.
Overview
MCP evaluation is different from other evaluations because you can choose to create single-turn test cases or multi-turn test cases based on your application design and architecture.
In this 10 min quickstart, you'll learn how to:
- Track your MCP interactions
- Create test cases for your application
- Evaluate your MCP based application using MCP metrics
Prerequisites
- Install
deepeval, an MCP client, and whichever LLM SDK your host calls - A Confident AI API key (recommended). Sign up for one here
This quickstart's host talks to its server over streamable HTTP and calls Anthropic:
pip install -U deepeval mcp anthropicUnderstanding MCP Evals
Model Context Protocol (MCP) is an open-source framework developed by Anthropic to standardize how AI systems, particularly large language models (LLMs), interact with external tools and data sources. The MCP architecture is composed of three main components:
- Host — The AI application that coordinates and manages one or more MCP clients
- Client — Maintains a one-to-one connection with a server and retrieves context from it for the host to use
- Server — Paired with a single client, providing the context the client passes to the host
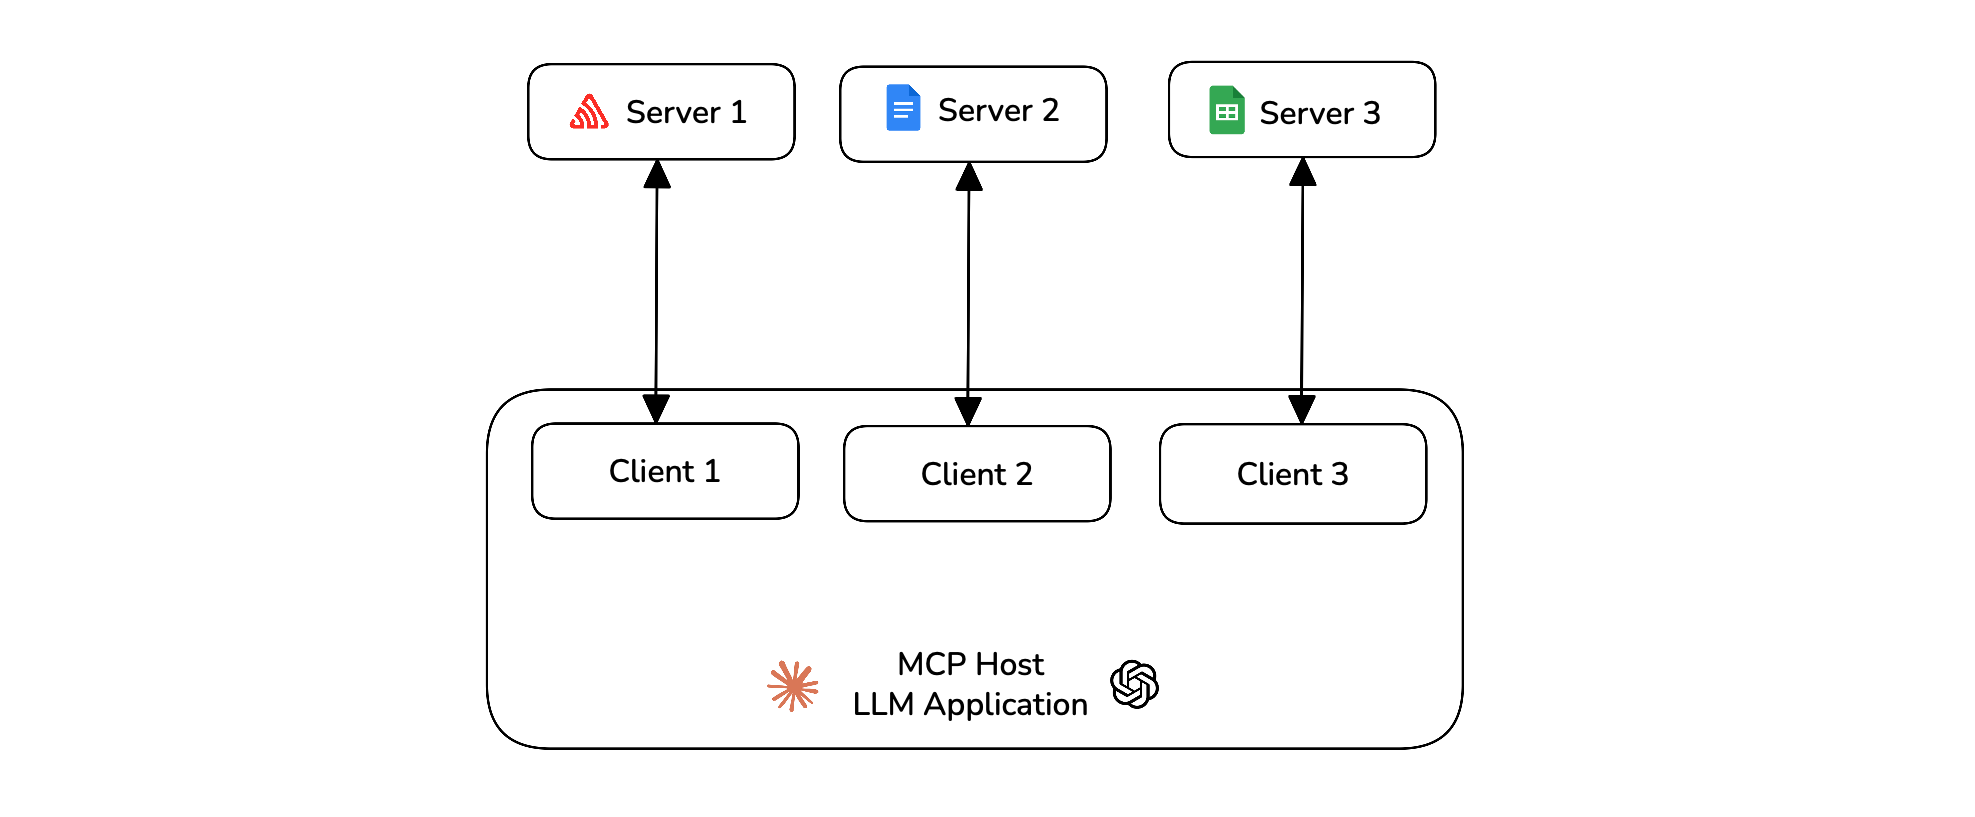
deepeval allows you to evaluate the MCP host on various criterion like its primitive usage, argument generation and task completion.
Run Your First MCP Eval
In deepeval MCP evaluations can be done using either single-turn or multi-turn test cases. In code, you'll have to track all MCP interactions and finally create a test case after the execution of your application.
MCP metrics judge with an LLM, which defaults to OpenAI. You can judge with any model deepeval supports instead:
To use OpenAI for deepeval's LLM metrics, supply your OPENAI_API_KEY in the CLI:
export OPENAI_API_KEY=<your-openai-api-key>Alternatively, if you're working in a notebook environment (Jupyter or Colab), set your OPENAI_API_KEY in a cell:
%env OPENAI_API_KEY=<your-openai-api-key>deepeval also allows you to use Azure OpenAI for metrics that are evaluated using an LLM. Run the following command in the CLI to configure your deepeval environment to use Azure OpenAI for all LLM-based metrics.
deepeval set-azure-openai \
    --base-url=<endpoint> \ # e.g. https://example-resource.azure.openai.com/
    --model=<model_name> \ # e.g. gpt-4.1
    --deployment-name=<deployment_name> \  # e.g. Test Deployment
    --api-version=<api_version> \ # e.g. 2025-01-01-preview
--model-version=<model_version> # e.g. 2024-11-20Note that the model-version is optional. If you ever wish to stop using Azure OpenAI and move back to regular OpenAI, simply run:
deepeval unset-azure-openaiTo use Ollama models for your metrics, run deepeval set-ollama --model=<model> in your CLI. For example:
deepeval set-ollama --model=deepseek-r1:1.5bOptionally, you can specify the base URL of your local Ollama model instance if you've defined a custom port. The default base URL is set to http://localhost:11434.
deepeval set-ollama --model=deepseek-r1:1.5b \
    --base-url="http://localhost:11434"
To stop using your local Ollama model and move back to OpenAI, run:
deepeval unset-ollamaTo use Gemini models with deepeval, run the following command in your CLI.
deepeval set-gemini \
    --model=<model_name> # e.g. "gemini-2.0-flash-001"
deepeval allows you to use ANY custom LLM for evaluation. This includes LLMs from langchain's chat model integrations, Hugging Face's transformers library, or even LLMs in GGML format.
This includes any of your favorite models such as:
- Azure OpenAI
- Claude via AWS Bedrock
- Google Vertex AI
- Mistral 7B
All the examples can be found here, but down below is a quick example of a custom Azure OpenAI model through langchain's AzureChatOpenAI module for evaluation:
from langchain_openai import AzureChatOpenAI
from deepeval.models.base_model import DeepEvalBaseLLM

class AzureOpenAI(DeepEvalBaseLLM):
    def __init__(
        self,
        model
    ):
        self.model = model

    def load_model(self):
        return self.model

    def generate(self, prompt: str) -> str:
        chat_model = self.load_model()
        return chat_model.invoke(prompt).content

    async def a_generate(self, prompt: str) -> str:
        chat_model = self.load_model()
        res = await chat_model.ainvoke(prompt)
        return res.content

    def get_model_name(self):
        return "Custom Azure OpenAI Model"

# Replace these with real values
custom_model = AzureChatOpenAI(
    openai_api_version=api_version,
    azure_deployment=azure_deployment,
    azure_endpoint=azure_endpoint,
    openai_api_key=openai_api_key,
)
azure_openai = AzureOpenAI(model=custom_model)
print(azure_openai.generate("Write me a joke"))
When creating a custom LLM evaluation model you should ALWAYS:
- inherit
DeepEvalBaseLLM. - implement the
get_model_name()method, which simply returns a string representing your custom model name. - implement the
load_model()method, which will be responsible for returning a model object. - implement the
generate()method with one and only one parameter of type string that acts as the prompt to your custom LLM. - the
generate()method should return the final output string of your custom LLM. Note that we calledchat_model.invoke(prompt).contentto access the model generations in this particular example, but this could be different depending on the implementation of your custom model object. - implement the
a_generate()method, with the same function signature asgenerate(). Note that this is an async method. In this example, we calledawait chat_model.ainvoke(prompt), which is an asynchronous wrapper provided by LangChain's chat models.
Lastly, to use it for evaluation for an LLM-Eval:
from deepeval.metrics import AnswerRelevancyMetric
...

metric = AnswerRelevancyMetric(model=azure_openai)Create an MCP server
Connect your application to MCP servers and create the MCPServer object for all the MCP servers you're using.
import mcp

from contextlib import AsyncExitStack
from mcp import ClientSession
from mcp.client.streamable_http import streamablehttp_client
from deepeval.test_case import MCPServer

url = "https://example.com/mcp"

mcp_servers = []
tools_called = []

async def main():
    read, write, _  = await AsyncExitStack().enter_async_context(streamablehttp_client(url))
    session = await AsyncExitStack().enter_async_context(ClientSession(read, write))
    await session.initialize()

    tool_list = await session.list_tools()

    mcp_servers.append(MCPServer(
        server_name=url,
        transport="streamable-http",
        available_tools=tool_list.tools,
    ))
Track your MCP interactions
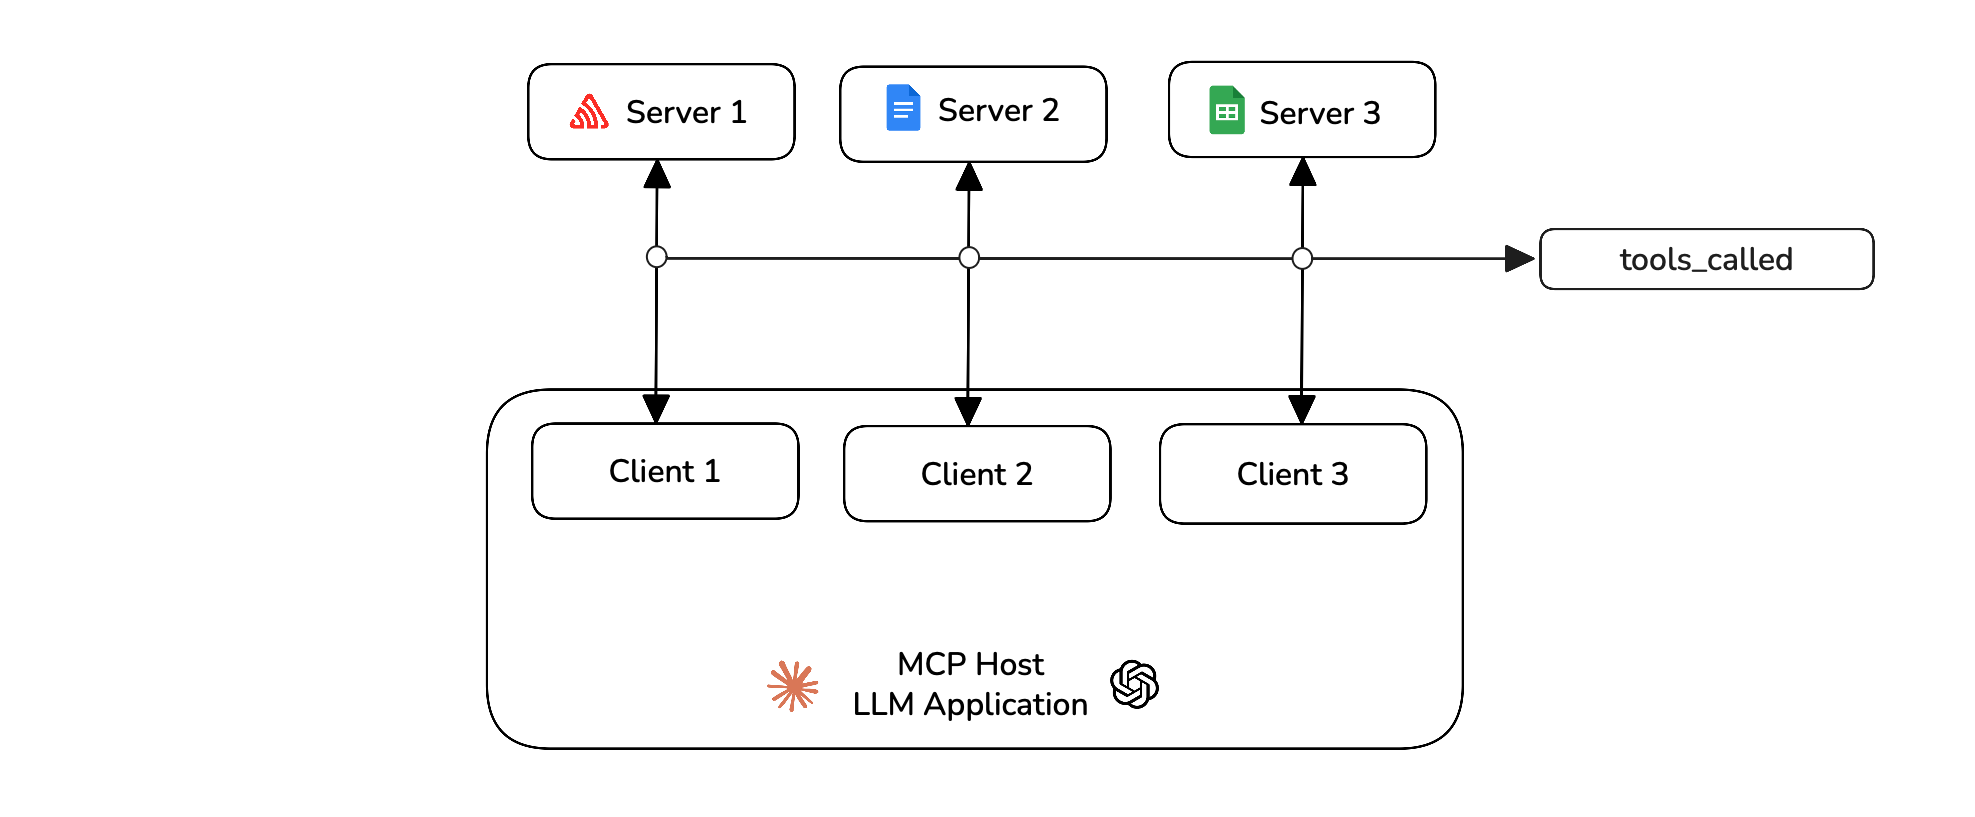
In your MCP application's main file, you need to track all the MCP interactions during run time. This includes adding tools_called, resources_called and prompts_called whenever your host uses them.
from deepeval.test_case import MCPToolCall

available_tools = [
    {"name": tool.name, "description": tool.description, "input_schema": tool.inputSchema}
    for tool in tool_list
]

response = self.anthropic.messages.create(
    model="claude-3-5-sonnet-20241022",
    messages=messages,
    tools=available_tools,
)

for content in response.content:
    if content.type == "tool_use":
        tool_name = content.name
        tool_args = content.input
        result = await session.call_tool(tool_name, tool_args)

        tools_called.append(MCPToolCall(
            name=tool_name,
            args=tool_args,
            result=result
        ))
You can also track any resources or prompts if you use them. You are now tracking all the MCP interactions during run time of your application.
Create a test case
You can now create a test case for your MCP application using the above interactions.
from deepeval.test_case import LLMTestCase
...

test_case = LLMTestCase(
    input=query,
    actual_output=response,
    mcp_servers=mcp_servers,
    mcp_tools_called=tools_called,
)
The test cases must be created after the execution of your application.
Click here to see a full example on how to create single-turn test cases for MCP evaluations.
Define metrics
You can now use the MCPUseMetric to run evals on your single-turn your test case.
from deepeval.metrics import MCPUseMetric

mcp_use_metric = MCPUseMetric()
Run an evaluation
Run an evaluation on the test cases you previously created using the metrics defined above.
from deepeval import evaluate

evaluate([test_case], [mcp_use_metric])
🎉🥳 Congratulations! You just ran your first single-turn MCP evaluation. Here's what happened:
- When you call
evaluate(),deepevalruns all yourmetricsagainst alltest_cases - All
metricsoutputs a score between0-1, with athresholddefaulted to0.5 - The
MCPUseMetricfirst evaluates your test case on its primitive usage to see how well your application has utilized the MCP capabilities given to it. - It then evaluates the argument correctness to see if the inputs generated for your primitive usage were correct and accurate for the task.
- The
MCPUseMetricthen finally takes the minimum of the both scores to give a final score to your test case.
View on Confident AI (recommended)
If you've set your CONFIDENT_API_KEY, test runs will appear automatically on Confident AI, which deepeval integrates with natively.
Multi-Turn MCP Evals
For multi-turn MCP evals, you are required to add the mcp_tools_called, mcp_resources_called and mcp_prompts_called in the Turn object for each turn of the assistant. (if any)
Track your MCP interactions
During the interactive session of your application, you need to track all the MCP interactions. This includes adding tools_called, resources_called and prompts_called whenever your host uses them.
from deepeval.test_case import MCPToolCall, Turn

async def main():
    ...

    result = await session.call_tool(tool_name, tool_args)
    tool_called = MCPToolCall(name=tool_name, args=tool_args, result=result)

    turns.append(
        Turn(
            role="assistant",
            content=f"Tool call: {tool_name} with args {tool_args}",
            mcp_tools_called=[tool_called],
        )
    )
You can also track any resources or prompts if you use them. You are now tracking all the MCP interactions during run time of your application.
Create a test case
You can now create a test case for your MCP application using the above turns and mcp_servers.
from deepeval.test_case import ConversationalTestCase

convo_test_case = ConversationalTestCase(
    turns=turns,
    mcp_servers=mcp_servers
)
The test cases must be created after the execution of the application.
Click here to see a full example on how to create multi-turn test cases for MCP evaluations.
Define metrics
You can now use the MCP metrics to run evals on your test cases. There's two metrics for multi-turn test cases that support MCP evals.
from deepeval.metrics import MultiTurnMCPUseMetric, MCPTaskCompletionMetric

mcp_use_metric = MultiTurnMCPUseMetric()
mcp_task_completion = MCPTaskCompletionMetric()
Run an evaluation
Run an evaluation on the test cases you previously created using the metrics defined above.
from deepeval import evaluate

evaluate([convo_test_case], [mcp_use_metric, mcp_task_completion])
🎉🥳 Congratulations! You just ran your first multi-turn MCP evaluation. Here's what happened:
- When you call
evaluate(),deepevalruns all yourmetricsagainst alltest_cases - All
metricsoutputs a score between0-1, with athresholddefaulted to0.5 - You used the
MultiTurnMCPUseMetricandMCPTaskCompletionMetricfor testing your MCP application - The
MultiTurnMCPUseMetricevaluates your application's capability on primitive usage and argument generation to get the final score. - The
MCPTaskCompletionMetricevaluates whether your application has satisfied the given task for all the interactions between user and assistant.
View on Confident AI (recommended)
If you've set your CONFIDENT_API_KEY, test runs will appear automatically on Confident AI, which deepeval integrates with natively.
Next Steps
Now that you have run your first MCP eval, you should:
- Customize your metrics: You can change the threshold of your metrics to be more strict to your use-case.
- Prepare a dataset: If you don't have one, generate one as a starting point to store your inputs as goldens.
- Setup Tracing: If you created your own custom MCP server, you can setup tracing on your tool definitions.
You can learn more about MCP here.