Evaluate Multi-Turn Convos
In the previous section, we built a chatbot that:
- Diagnosis patients
- Schedules appointments according to the diagnosis
- Retains memory throughout a conversation
To evaluate a multi-turn chatbot that does all the above, we first have to model conversations as multi-turn interactions in deepeval:
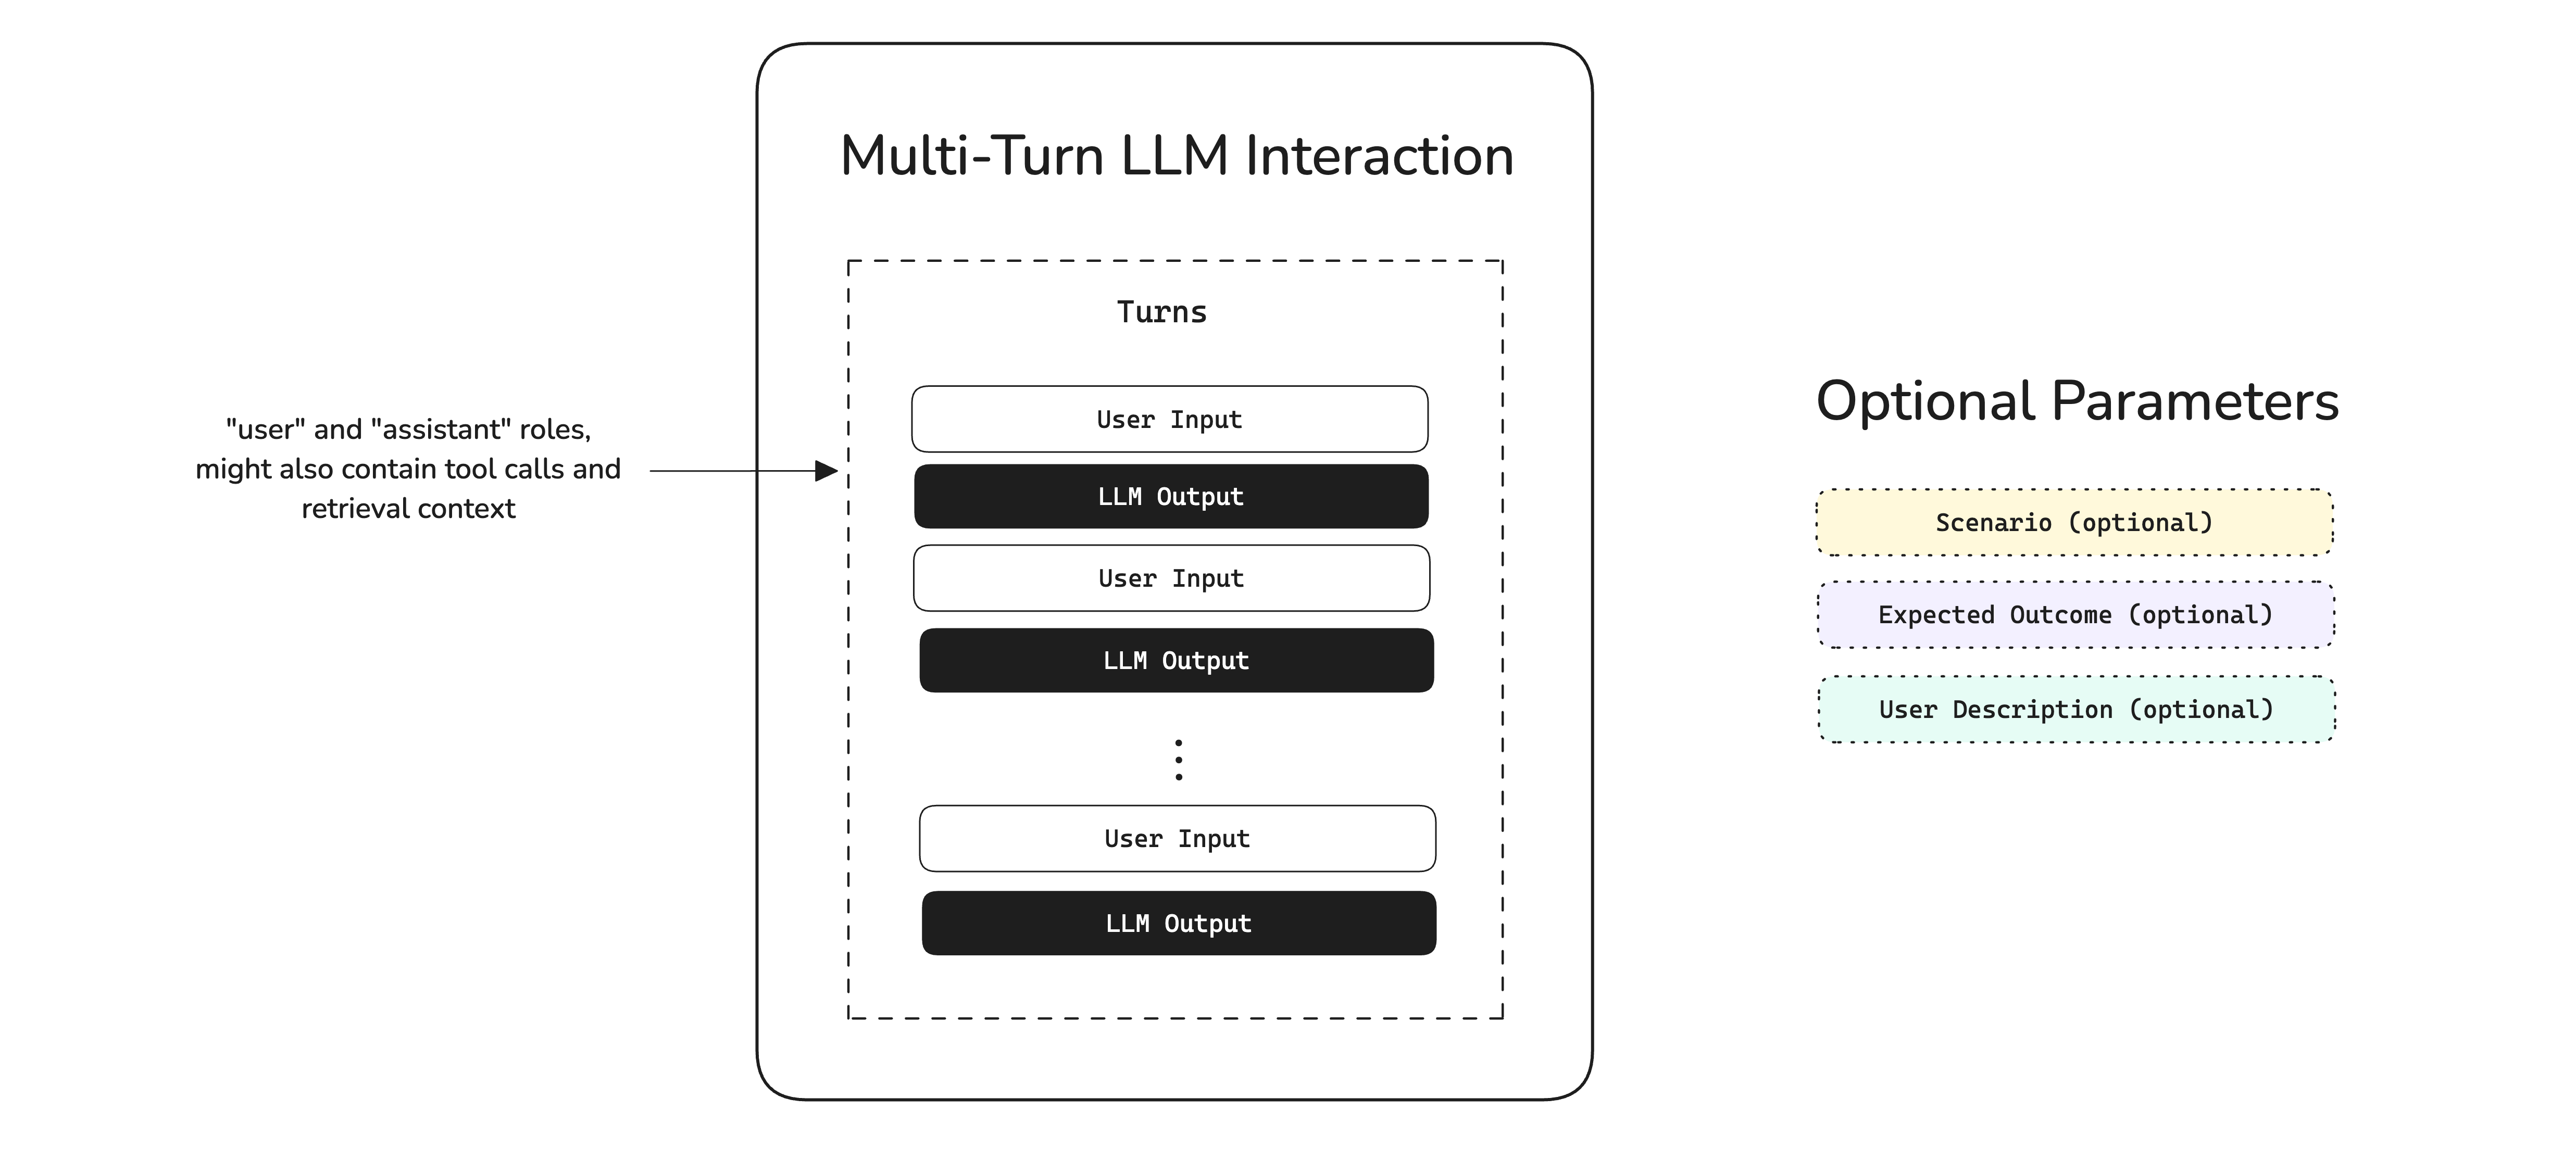
A multi-turn "interaction" is composed of turns, which is the conversation itself, and any other optional parameters such as scenario, expected outcome, etc. which we will learn about later in this section. In code, a multi-turn interaction is represented by a ConversationalTestCase:
from deepeval.test_case import ConversationalTestCase

test_case = ConversationalTestCase(
    turns=[
        Turn(role="user", content="I've a sore throat."),
        Turn(role="assistant", content="Thanks for letting me know?"),
    ]
)Setup Testing Environment
When evaluating multi-turn conversations, there are three primary approaches:
-
Use Historical Conversations - Pull conversations from your production database and run evaluations on that existing data.
-
Generate Conversations Manually - Prompt the model to produce conversations in real time and then run evaluations on those conversations.
-
Simulate User Interactions - Interact with your chatbot through simulations, and then run evaluations on the resulting conversations.
By far, option 3 is the best way to test multi-turn conversations. But we'll still go through options 1 and 2 quickly to show why they are flawed.
Use historical data
If you have conversations stored in your database, you can convert them to ConversationalTestCase objects:
from deepeval.test_case import ConversationalTestCase, Turn

# Example: Fetch conversations from your database
conversations = fetch_conversations_from_db()  # Your database query here

test_cases = []
for conv in conversations:
    turns = [Turn(role=msg["role"], content=msg["content"]) for msg in conv["messages"]]
    test_case = ConversationalTestCase(turns=turns)
    test_cases.append(test_case)

print(test_cases)
Using historical conversations is the quickest to run because the data already exists, but it only provides ad-hoc insights into past performance and cannot reliably evaluate how a new version will perform. Results from this approach are mostly backward-looking.
Manual prompting
To generate conversations manually, you have to create turns from interacting with your chatbot and constructing a ConversationalTestCase once a conversation has completed:
from deepeval.test_case import ConversationalTestCase, Turn

# Initialize test case list
test_cases = []

def start_session(chatbot: MedicalChatbot):
    turns = []
    while True:
        user_input = input("Your query: ")
        if user_input.lower() == 'exit':
            break

        # Call chatbot
        response = chatbot.agent_with_memory.invoke({"input": user_input}, config={"configurable": {"session_id": session_id}})
        # Add turns to list
        turns.append(Turn(role="user", content=user_input))
        turns.append(Turn(role="assistant", content=response["output"]))

        print("Baymax:", response["output"])

# Initialize chatbot and start session
chatbot = MedicalChatbot(model="...", system_prompt="...")
start_session(chatbot)

# Print test cases
print(test_cases)
In this example, we called chatbot.agent_with_memory.invoke from langchain and collected the turns as user and assistant contents. Although effective, this method is extremely time consuming and hence not the most effective.
User simulations
It is highly recommended to simulate turns instead, because you:
- Test against the current version of your system without relying on historical conversations
- Avoid manual prompting and can fully automate the process
- Create consistent benchmarks, e.g., simulating a fixed number of conversations across the same scenarios, which makes performance comparisons straightforward (more on this later)
First standardize your testing dataset by creating a list of goldens (click here to learn more):
from deepeval.dataset import EvaluationDataset, ConversationalGolden

goldens = [
    ConversationalGolden(
        scenario="User with a sore throat asking for paracetamol.",
        expected_outcome="Gets a recommendation for panadol."
    ),
    ConversationalGolden(
        scenario="Frustrated user looking to rebook their appointment.",
        expected_outcome="Gets redirected to a human agent"
    ),
    ConversationalGolden(
        scenario="User just looking to talk to somebody.",
        expected_outcome="Tell them this chatbot isn't meant for this use case."
    )
]

# Create dataset and optionally push to Confident AI
dataset = EvaluationDataset(goldens=goldens)
dataset.push(alias="Medical Chatbot Dataset")
In reality, you'll need at least 20 goldens for a barely-big-enough dataset, as each golden produces a single test case.
Once you have defined your scenarios, use deepeval's ConversationSimulator to simulate turns to create a list of ConversationalTestCases:
from deepeval.test_case import Turn
from deepeval.simulator import ConversationSimulator

# Wrap your chatbot in a callback func
def model_callback(input, turns: List[Turn], thread_id: str) -> Turn:
        # 1. Get latest simulated user input
        user_input = turns[-1].content
        # 2. Call chatbot
        response = chatbot.agent_with_memory.invoke({"input": user_input}, config={"configurable": {"session_id": session_id}})
        # 3. Return chatbot turn
        return Turn(role="assistant", content=response["output"])


simulator = ConversationSimulator(model_callback=model_callback)
test_cases = simulator.simulate(goldens=dataset.goldens)
✅ Done. We now need to create our metrics to run evaluations on these test cases.
Create Your Metrics
Often times a conversation can be evaluated based on 1-2 generic criteria, and 1-2 use case specific ones. In our example, a generic criteria would be something like relevancy, while use case specific would be something like faithfulness.
Relevancy
Relevancy is a generic metric because it is a criteria that can be applied to virtually any use case. This is how you can create a relevancy metric in deepeval:
from deepeval.metrics import TurnRelevancyMetric

relevancy = TurnRelevancyMetric()
Under-the-hood, the TurnRelevancyMetric loops through each assistant turn and uses a sliding window approach to construct a series of "unit interactions" as historical context for evaluation. Click here to learn more about the TurnRelevancyMetric and how it is calculated.
Faithfulness
Faithfulness is specific to our LLM chatbot as our chatbot uses external knowledge from the The Gale Encyclopedia of Alternative Medicine to make diagnoses (as explained in the previous section). deepeval also offers a faithfulness metric for multi-turn use cases:
from deepeval.metrics import TurnFaithfulnessMetric

faithfulness = TurnFaithfulnessMetric()
Click here to learn more about the TurnRelevancyMetric and how it is calculated.
Run Your First Multi-Turn Eval
All that's left right now is to run an evaluation:
from deepeval import evaluate
...

# Test cases and metrics from previous sections
evaluate(
    test_cases=[test_cases],
    metrics=[relevancy, faithfulness],
    hyperparameters={
        "Model": MODEL, # The model used in your agent
        "Prompt": SYSTEM_PROMPT # The system prompt used in your agent
    }
)
🎉🥳 Congratulations! You've successfully learnt how to evaluate your chatbot. In this example, we:
- Created a test run/benchmark of our chatbot based on the test cases and metrics using the
evaluate()function - Associated "hyperparameters" with the test run we've just created which will allow us to retrospectively find the best models and prompts
You can also run deepeval view to see results on Confident AI:
[show something on Confident AI]
Each relevancy and faithfulness score is now tied to a specific model and prompt version, making it easy to compare results whenever we update either parameter.
In the next section, we'll explore how to utilize eval results in your development workflow.